Disclosure: This shop has been compensated by Collective Bias, Inc. and its advertiser. All opinions are mine alone. AD #MyPetMyStar #CollectiveBias
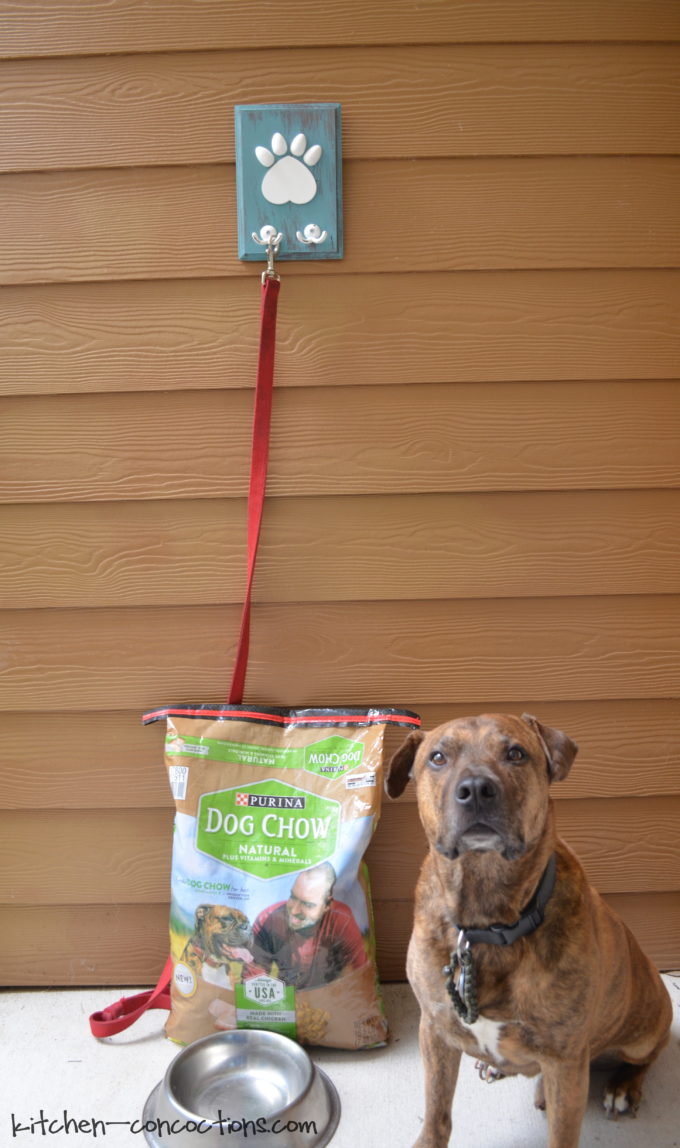
Pampering our family dog means long evening walks! To keep his leash neatly in one place I created a custom DIY Dog Leash Hanger for our front door! Check out all the details and the step-by-step tutorial below!

When I was a kid, we had several family dogs throughout my childhood. There was the Irish Setter that my Mom had before she got married and who welcomed me when I was born. And then later on we got a full bread Collie one year for Christmas, who stole all our hearts; and then after I moved away, my Mom rescued another Irish Setter that was a bit of a handful but I can’t imagine not having him a part of our lives!
My Mom is definitely an animal lover, and while I have always loved our pets, and if I am being honest all animals, it wasn’t until I was an adult that I realized just how much our pets make our houses into homes!

Mojo, a rescue mutt, was my first pet as an adult living on my own and I am so happy that he is part of our family! There is no doubt about it, that our pup brings so much joy into our lives! Not only is he so kindhearted and gentle, but he is just such an overall good dog!
One way that I unwind at the end of the day is by taking a long evening walk with Mo! It is so good for both of us to get out of the house, get some fresh air and stretch our legs. Mojo loves it because he can sniff and explore. It is really our happy place! Then as soon as we get home, Mo knows that it is time for dinner, and like clockwork if 7 o’clock rolls around and if he hasn’t been fed, he starts barking to remind us!

Since we want Mo to be a part of our family for a long time, it is important to us that he gets the star treatment! This not only means evening walks, but feeding him dog food that will help him live a long and happy life. That’s why I was happy to discover the new Purina® Dog Chow® Natural while picking up some groceries recently at Kroger. Mo is already Purina® pup and this new Purina® Dog Chow® Natural features natural ingredients, 23 essential vitamins and minerals, all without artificial colors, flavors or preservatives. Not only is this a dog food I can feel good about feeding Mo, I can conveniently pick it up while doing regular grocery shopping at Kroger, which saves me time and money!

Because we are always on the go and bringing Mojo along for the fun, it is important that his leash is in a convenient spot. However, it is usually somewhere random and takes a few minutes to find. Recently, we hammered a nail into the wall by our front door to hang Mo’s leash, since we were tired of always having to look for it. However, that looks so tacky! So, I decided to get a little bit crafty (which in addition to taking evening walks with Mo, crafting is another way I like to de-stress), and created a custom dog leash hanger. I was so happy how this simple craft project turned out! Not only was it fun to make but it is also functional!
How do you pamper your pup? Please share in the comments below!

DIY Dog Leash Hanger
by Heather H. of Kitchen Concoctions: www.kitchen-concoctions.com
Printable Version
Supplies:
1 (7×10-inch) unfinished wooden plaque
1 (3-inch) wooden heart cut-out
4 (7/8×1.26-inch) wooden split egg cut-outs
1 bottle brown acrylic paint (or color of choice)
1 bottle white acrylic paint (or color of choice)
1 bottle turquoise/teal acrylic paint (or color of choice)
Paper plates
1 small foam brush
1 medium foam brush
1 (1-inch) bristle paint brush
Newspaper/butcher paper
1 bottle wood glue
Tape measure
2 decorative metal hangers/hooks
2 small screws to fit metal hangers
Screwdriver
1 sawtooth picture hanger
2 small nails
1 larger nail
Hammer
Directions:

1. Spread newspaper over a large table. Place wooden plaque on top of newspaper. Pour several tablespoons of brown acrylic paint onto paper plate. Using sponge brush, paint a thin layer of pain on the front and sides of the wooden plaque. Set aside and dry completely.

2. Place wooden heart and ovals on newspaper. Pour several tablespoons of white acrylic paint onto paper plate. Using small foam brush, paint wooden heart and half eggs with a thick layer of white acrylic paint. Set aside and dry completely. Apply another layer of white paint if needed to reach desired look and let dry again.

3. Meanwhile, pour several tablespoons of teal acrylic paint onto paper plate. Using paint brush, paint teal paint over dried brown paint on wooden plaque using long brush strokes; allowing some of the brown paint to show through (it doesn’t have to be perfect as you want a “rustic” look). Set aside and dry completely.


4. Once wooden shapes and wooden plaque are completely dry, use tape measure to place metal hooks on the bottom of the plaque in desired location. Use screws and screwdriver and screw hooks to wooden plaque.

5. Use tape measure to center painted wooden heart upside down in the center of the plaque. Spread a thin layer of wood glue on the back of the painted heart and glue to the center of the plaque. If some glue oozes out, quickly wipe away with a damp paper towel.
6. Arrange the four painted half ovals around the top of the upside down heart. Spread a thin layer of wood glue on the back of the painted half eggs. Adhere the half eggs around the heart. Allow wood glue to dry completely.

7. Once glue is dry, flip over plaque and nail sawtooth hanger to the top of the plaque. Hammer a nail into the wall and hang plaque. Add dog leash and enjoy!
Stock up on all your pet care needs, including the new Purina® Dog Chow® Natural at your local Kroger. Don’t forget to take advantage of all the current pet coupons available exclusively at Kroger stores and save $2 off Purina® Dog Chow® Natural dry dog food, $1 Off Tidy Cats Lightweight Litter or $1 Off Tidy Cats Litter. For more fun ideas on how to pamper your pooch, follow Purina on Facebook, Twitter, Instagram and YouTube!


We have something similar on the side of the dog cabinet I made, but we really should put one buy the door too. Thanks for the great tutorial! #client